Simplified Guide: Integrating Icons with react-native-vector-icons in React Native (2024)
A companion guide to the official docs — covering iOS and Android setup for bare React Native projects with common pitfalls and fixes.

The official documentation from react-native-vector-icons is your go-to guide, but things don't always match up exactly as expected — especially on bare React Native projects. This guide is here to fill the gaps.
Development environment
- Xcode: 14.3.1
- macOS: Ventura 13.0.1
- React: 18.2.0
- React Native: 0.73.6
react-native-vector-icons: 10.0.3
In this guide, italic text is quoted directly from the official documentation, and bold text is my own commentary.
Installation
npm install --save react-native-vector-icons
iOS setup
Open your iOS project in Xcode by navigating to your project directory and opening the .xcworkspace file.
Copy fonts to your Xcode project:
Navigate to node_modules/react-native-vector-icons and drag the Fonts folder (or specific fonts) into your Xcode project. Make sure your app is checked under "Add to targets," and if adding the whole folder, check "Create groups."

Your folder structure should look like this:

Edit Info.plist and add a property called Fonts provided by application (or UIAppFonts if Xcode autocomplete isn't working):
Full list of available fonts to copy into Info.plist:
<key>UIAppFonts</key>
<array>
  <string>AntDesign.ttf</string>
  <string>Entypo.ttf</string>
  <string>EvilIcons.ttf</string>
  <string>Feather.ttf</string>
  <string>FontAwesome.ttf</string>
  <string>FontAwesome5_Brands.ttf</string>
  <string>FontAwesome5_Regular.ttf</string>
  <string>FontAwesome5_Solid.ttf</string>
  <string>FontAwesome6_Brands.ttf</string>
  <string>FontAwesome6_Regular.ttf</string>
  <string>FontAwesome6_Solid.ttf</string>
  <string>Foundation.ttf</string>
  <string>Ionicons.ttf</string>
  <string>MaterialIcons.ttf</string>
  <string>MaterialCommunityIcons.ttf</string>
  <string>SimpleLineIcons.ttf</string>
  <string>Octicons.ttf</string>
  <string>Zocial.ttf</string>
  <string>Fontisto.ttf</string>
</array>
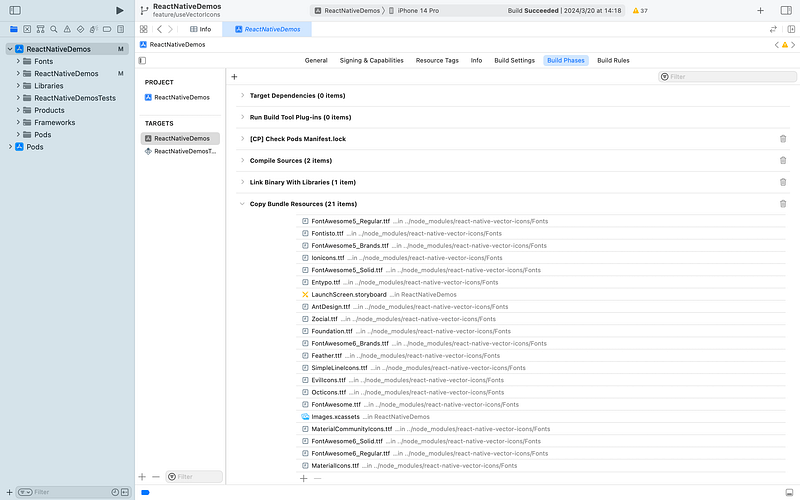
Check Build Phases:
In Xcode, select your project in the navigator, choose your app's target, go to the Build Phases tab, and under Copy Bundle Resources, add the copied fonts.
In some cases the fonts may already be listed under "Copy Bundle Resources" — if so, no action needed.
Create react-native.config.js:
When using auto-linking, all fonts are automatically added to Build Phases > Copy Pods Resources, which bloats your bundle. To prevent this, create a react-native.config.js file at the root of your project:
If the file doesn't exist yet, create it and set the iOS configuration to null.
module.exports = {
  dependencies: {
    'react-native-vector-icons': {
      platforms: {
        ios: null,
      },
    },
  },
};
Note: If you encounter a "Multiple commands produce…" error after following the official docs, remove any duplicate font references under "Copy Bundle Resources". See this issue thread for the fix with the most upvotes.
Rebuild your project — you're ready to use vector icons.

Android setup
Edit android/app/build.gradle (not android/build.gradle) and add:
apply from: file("../../node_modules/react-native-vector-icons/fonts.gradle")
Copy fonts to your Android project:
Navigate to android/app/src/main/assets/fonts and paste the Fonts folder there.
If the assets folder doesn't exist, create it — use lowercase for all folder names.