How to Implement Swipe-to-Delete in React Native: A Step-by-Step Tutorial
A step-by-step guide to implementing swipe-to-delete in React Native using react-native-gesture-handler, for both CLI and Expo projects.
Originally written in 2024. Content may vary slightly across newer versions.
Introduction
Swipe-to-delete functionality enhances user interaction by allowing effortless removal of items from lists with a simple swipe gesture. In this tutorial, we’ll demonstrate how to achieve swipe-to-delete in React Native projects, whether set up with React Native CLI or Expo!
Step-by-Step Guide: React Native CLI Project
Initialize a new React Native project using the React Native CLI:
npx react-native init SwipeToDeleteRN
Dependencies Installation:
Install the required dependencies for swipe-to-delete:
npm install react-native-gesture-handler
For iOS users, navigate to the iOS directory and run:
pod install
In the App.js, wrap the app within a gesture handler root view and ensure to apply flex: 1 to the component:
import { GestureHandlerRootView } from "react-native-gesture-handler";

const App = () => {
  return (
    <GestureHandlerRootView style={{ flex: 1 }}>
      <MessagesScreen />
    </GestureHandlerRootView>
  );
};

export default App;
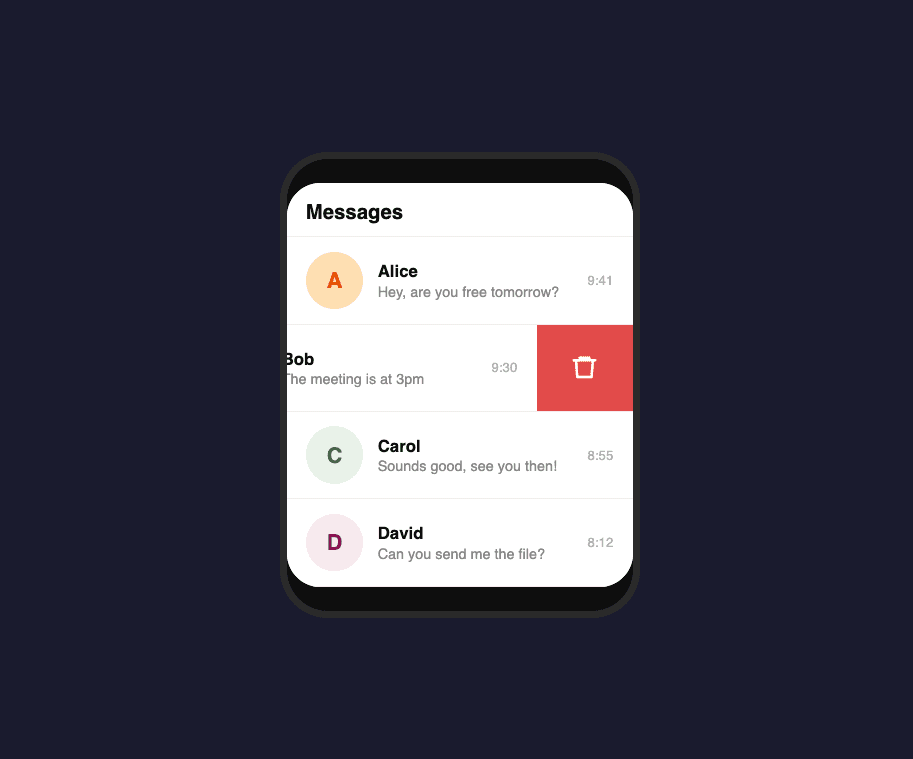
The above code snippets contain a messages screen to display a list of messages that can be swipe deleted.
Here is the breakdown for the MessagesScreen component:
import { FlatList, StyleSheet } from 'react-native';
import React, { useState } from 'react';

import Screen from '../components/Screen';
import ListItem from '../components/ListItem';
import ListItemSeparator from '../components/ListItemSeparator';
import ListItemDeleteAction from '../components/ListItemDeleteAction';

const initialMessages = [
  {
    id: 1,
    title: 'title one',
    description: 'description one',
    image: require('../assets/cat.jpg'),
  },
  {
    id: 2,
    title: 'title two',
    description: 'description two',
    image: require('../assets/cat.jpg'),
  },
  {
    id: 3,
    title: 'title three',
    description: 'description three',
    image: require('../assets/cat.jpg'),
  },
];

export default function MessagesScreen() {
  const [messages, setMessages] = useState(initialMessages);
  const [refreshing, setRefreshing] = useState(false);
  const handleDelete = message => {
    setMessages(messages => messages.filter(item => item.id !== message.id));
  };
  return (
    <Screen>
      <FlatList
        data={messages}
        keyExtractor={item => item.id}
        renderItem={({ item }) => (
          <ListItem
            title={item.title}
            subTitle={item.description}
            image={item.image}
            onPress={() => console.log('item clicked.')}
            renderRightActions={() => (
              <ListItemDeleteAction onPress={() => handleDelete(item)} />
            )}
          />
        )}
        ItemSeparatorComponent={ListItemSeparator}
        refreshing={refreshing}
        onRefresh={() => {
          setMessages([
            {
              id: 1,
              title: 'title one',
              description: 'description one',
              image: require('../assets/cat.jpg'),
            },
          ]);
        }}
      />
    </Screen>
  );
}

const styles = StyleSheet.create({});
In this component:
We define a state variable
messagesto hold the list of messages. Initially, it contains some dummy messages.We define a function
handleDeleteto remove a message from the list when the delete action is triggered.Inside the
FlatList, each message is rendered using theListItemcomponent, which displays the title, description, and an image.The
ListItemDeleteActioncomponent is used to render the delete button, which triggers thehandleDeletefunction when pressed.The
renderRightActionsprop ofListItemcomponent renders the delete action using theListItemDeleteActioncomponent.
In the ListItem component, import Swipeable from react-native-gesture-handler/Swipeable and wrap it around the entire component while passing the renderRightActions prop:
import { Image, StyleSheet, TouchableHighlight, View } from 'react-native';
import React from 'react';
import Swipeable from 'react-native-gesture-handler/Swipeable';
import AppText from './AppText';
import Colors from '../themes/Colors';

export default function ListItem({
  title,
  subTitle,
  image,
  onPress,
  renderRightActions,
}) {
  return (
    <Swipeable renderRightActions={renderRightActions}>
      <TouchableHighlight underlayColor={Colors.lightGrey} onPress={onPress}>
        <View style={styles.container}>
          <Image source={image} style={styles.image} />
          <View style={styles.detailsContainer}>
            <AppText style={styles.title}>{title}</AppText>
            <AppText style={styles.subTitle}>{subTitle}</AppText>
          </View>
        </View>
      </TouchableHighlight>
    </Swipeable>
  );
}

const styles = StyleSheet.create({
  container: {
    flexDirection: 'row',
    padding: 15,
  },
  image: {
    borderRadius: 35,
    width: 70,
    height: 70,
    marginRight: 10,
  },
  detailsContainer: {
    justifyContent: 'center',
  },
  title: {
    textTransform: 'capitalize',
    fontWeight: '500',
    paddingVertical: 5,
  },
  subTitle: {
    fontSize: 16,
    color: Colors.mediumGrey,
  },
});
The renderRightActions prop should be a function that returns a React component (ie: ListItemDeleteAction) representing the delete UI.
import { StyleSheet, TouchableWithoutFeedback, View } from 'react-native';
import React from 'react';
import Colors from '../themes/Colors';
import Icon from 'react-native-vector-icons/AntDesign';

export default function ListItemDeleteAction({ onPress }) {
  return (
    <TouchableWithoutFeedback onPress={onPress}>
      <View style={styles.container}>
        <Icon name="delete" color={Colors.white} size={30} />
      </View>
    </TouchableWithoutFeedback>
  );
}

const styles = StyleSheet.create({
  container: {
    backgroundColor: Colors.dangerRed,
    width: 70,
    justifyContent: 'center',
    alignItems: 'center',
  },
  icon: {
    color: Colors.white,
  },
});

The source code can be found here on GitHub.
Step-by-Step Guide: Expo Project
Initialize a new Expo project:
expo init SwipeToDeleteExpo
Install Dependencies:
Add the required dependencies for swipe-to-delete:
expo install react-native-gesture-handler
Implement Swipe-to-Delete:
Follow the same steps as the React Native CLI project to implement swipe-to-delete using the Swipeable component. And DO NOT FORGET to import in your project’s entry file (e.g., App.js). Otherwise Swipeable won’t work!
Testing:
Run your Expo project using the Expo client app or on a physical device to test swipe-to-delete functionality.
Conclusion
By following the provided steps, you can seamlessly integrate swipe-to-delete functionality into your React Native projects, regardless of whether they are set up with React Native CLI or Expo. Enhance user experience and interaction by enabling users to efficiently manage lists with intuitive swipe gestures.
We encourage you to run the provided source code on your development environment. By doing so, you’ll gain a deeper understanding of how swipe-to-delete works in practice and how you can customize it to fit your specific project requirements.
Happy coding! ☀️